
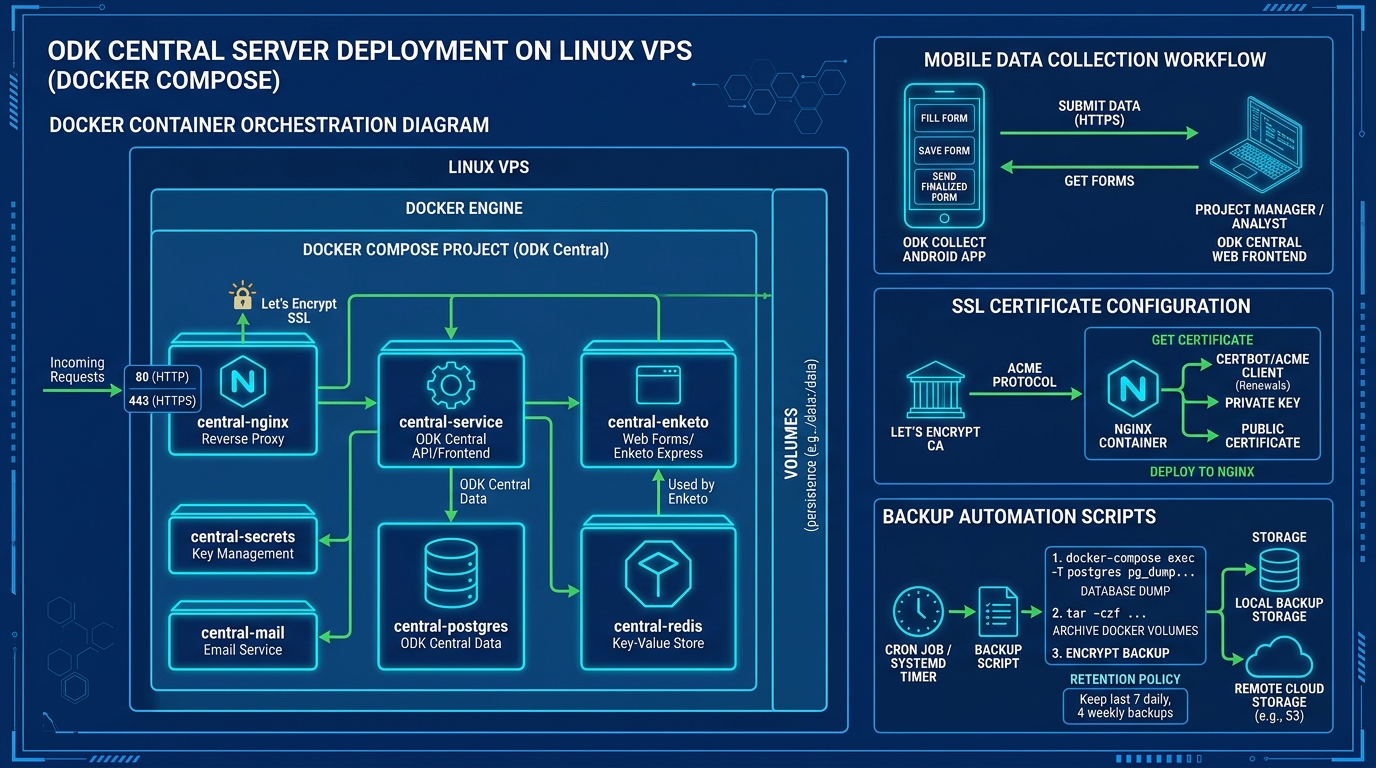
From nationwide public health surveys and agricultural mapping to humanitarian relief operations, ODK Central (Open Data Kit) has become the global standard for mobile data collection. Field enumerators across rural and urban Pakistan use ODK Collect on Android tablets and smartphones to collect geospatial data, capture photographic evidence, and fill out complex branching questionnaires offline.
However, operating ODK Central in production requires a reliable, performant, and secure backend. The core suite consists of multiple microservices—including the ODK Central Backend (Node.js), Enketo Express (web forms), PostgreSQL (relational storage), and Nginx with automated Let’s Encrypt SSL.
In this guide, we walk through setting up a hardened ODK Central instance on an Ubuntu Cloud VPS or Dedicated Servers in Pakistan.
Architectural Overview: ODK Central Microservices
ODK Central runs as a containerized stack managed via Docker Compose:
Field Enumerators (ODK Collect / Enketo)
                 │
                 ▼ (HTTPS / TLS 1.3 on Port 443)
        [Nginx Reverse Proxy]
                 │
       ┌─────────┴─────────┐
       ▼                   ▼
[ODK Central Service]   [Enketo Web Forms]
  (Node.js / REST API)    (Node.js Renderer)
       │                   │
       └─────────┬─────────┘
                 ▼
       [PostgreSQL Database]
       (Encrypted Form Submissions & Geodata)
Step 1: System Requirements & Firewall Setup
For production workloads supporting 50 to 500+ active field enumerators, ensure your server meets these minimum hardware specs:
- CPU: 2 vCPU cores (4 cores recommended for concurrent Enketo rendering)
- RAM: 4 GB RAM minimum (8 GB recommended for heavy submissions)
- Storage: 80 GB+ NVMe SSD (to accommodate high-resolution photo and audio attachments)
- OS: Ubuntu 22.04 LTS or 24.04 LTS
Configure the host firewall to allow only SSH, HTTP, and HTTPS:
# Update base system packages
sudo apt update && sudo apt upgrade -y

# Configure UFW
sudo ufw default deny incoming
sudo ufw default allow outgoing
sudo ufw allow 22/tcp
sudo ufw allow 80/tcp
sudo ufw allow 443/tcp
sudo ufw enable
Step 2: Installing Docker Engine and Docker Compose Plugin
ODK Central requires the official Docker Engine with Docker Compose V2:
# Install Docker prerequisites
sudo apt install -y ca-certificates curl gnupg lsb-release

# Add Docker's official GPG key
sudo install -m 0755 -d /etc/apt/keyrings
curl -fsSL https://download.docker.com/linux/ubuntu/gpg | sudo gpg --dearmor -o /etc/apt/keyrings/docker.gpg
sudo chmod a+r /etc/apt/keyrings/docker.gpg

# Set up repository
echo \
  "deb [arch=$(dpkg --print-architecture) signed-by=/etc/apt/keyrings/docker.gpg] https://download.docker.com/linux/ubuntu \
  $(lsb_release -cs) stable" | sudo tee /etc/apt/sources.list.d/docker.list > /dev/null

# Install Docker CE and Compose plugin
sudo apt update
sudo apt install -y docker-ce docker-ce-cli containerd.io docker-buildx-plugin docker-compose-plugin

# Verify installation
docker compose version
Step 3: Cloning ODK Central and Configuring Environment Variables
ODK Central uses a Git submodule architecture to ensure all associated services (Enketo, client web app) match tested versions:
# Clone the official repository into /opt/central
cd /opt
sudo git clone https://github.com/getodk/central.git
cd central

# Fetch and initialize submodules
sudo git submodule update -i

# Copy the environment template
sudo cp .env.template .env
Open .env in an editor and configure your production parameters:
sudo nano .envSet the following critical values:
# Domain configuration (Must point to your server IP via an A record)
SSL_TYPE=letsencrypt
DOMAIN=odk.yourdomain.pk
SYSADMIN_EMAIL[email protected]

# SMTP Settings for Invitation Emails & Reset Tokens
EMAIL_FROM[email protected]
EMAIL_HOST=smtp.yourmailserver.com
EMAIL_PORT=587
EMAIL_USER[email protected]
EMAIL_PASSWORD=SuperSecureSMTPPassword123!
Step 4: Launching ODK Central and Verifying SSL
Once your DNS A record has propagated, launch the entire container suite:
# Start all containers in detached mode
sudo docker compose build
sudo docker compose up -d
Monitor container initialization and automated Let’s Encrypt SSL certificate provisioning:
# Inspect container status
sudo docker compose ps

# Check Nginx and Certbot logs
sudo docker compose logs -f nginx
Once Nginx verifies the ACME HTTP-01 challenge, your SSL certificate is automatically installed, and the HTTPS endpoint is live.
Step 5: Creating the Initial System Administrator Account
Because public registration is disabled by default for data privacy, create the first administrator account via the CLI:
# Create system administrator account
sudo docker compose exec service odk-cmd --email [email protected] user-create

# Promote user to administrator role
sudo docker compose exec service odk-cmd --email [email protected] user-promote
Follow the prompt to set a secure password. You can now log in at https://odk.yourdomain.pk.
Step 6: Automated Off-Site PostgreSQL Backups
ODK Central stores survey metadata, encrypted form definitions, and responses in a dedicated PostgreSQL container. A reliable automated backup cron job is essential:
Create a backup script at /opt/central/backup_odk.sh:
#!/usr/bin/env bash
set -euo pipefail

BACKUP_DIR="/var/backups/odk"
DATE=$(date +%Y%m%d_%H%M%S)
mkdir -p "$BACKUP_DIR"

# Dump PostgreSQL database directly from container
docker compose -f /opt/central/docker-compose.yml exec -T postgres pg_dump -U odk central | gzip > "$BACKUP_DIR/odk_db_$DATE.sql.gz"

# Retain backups for 14 days
find "$BACKUP_DIR" -type f -name "odk_db_*.sql.gz" -mtime +14 -delete

echo "ODK Central backup completed at $DATE"
Make executable and add to crontab:
sudo chmod +x /opt/central/backup_odk.sh
(crontab -l 2>/dev/null; echo "0 3 * * * /opt/central/backup_odk.sh >> /var/log/odk_backup.log 2>&1") | crontab -
Deploying ODK Central on a high-speed Cloud VPS ensures seamless mobile data synchronization, sub-second latency across all Pakistani cellular networks, and full sovereign ownership of your organization’s sensitive research data.
Power Your ODK Central & Data Collection Infrastructure
Run your mobile data pipelines, Docker stacks, and survey databases on NextGen Cloud VPS. Enjoy lightning-fast local bandwidth across Pakistan, pure NVMe storage, automated snapshot backups, and 99.99% uptime.
